SublimeTextのAPIを外部から纏めて叩くやつ
概要
Sublime Text Advent Calendar 2014
http://www.adventar.org/calendars/407
12/5 に飛び込みで来ました、@toru_inoue です。
前日は霙(@xxmiz0rexx)さんでした。
http://webimemo.com/other/7926
自分が紹介するのはこんなのです。
SublimeSocket
https://github.com/sassembla/SublimeSocket3
Sublime Text のAPIを、ネットワークとかWebSocket越しにぶっ叩いたりできます。
ネットワーク越しに複数のSublime Text 間でチャットしたり、
コードにハイライトやエラー表示をしたりするのに使っています。
例えば
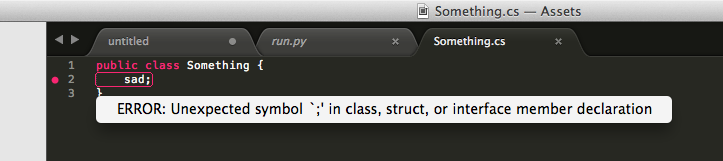
通常のAPIを使ってやるんだとわりと面倒な、
1.特定の行の文字を囲んで
2.赤丸のあたりを押したらツールチップを出す
みたいなことが、JSONっぽい式を渡すと外部から動かせるようになっている。
で、今回はアドベントカレンダーってことで、ちょっとしたサプライズとして、皆さんのSublime Textに何かを送り込んでみようと思う。
デモ
実際に動かして(動かされて)みよう!
☆Mac用しか用意できませんでしたすいません。
1.SublimeSocketパッケージをインストール
下記からDLして解凍、Sublime Text のPackageパスに置くと良いと思う。
Sublime Text 2の場合 -> Download ZIP
Sublime Text 3の場合 -> Download ZIP
2.次のファイルもダウンロード
テキストファイルです。あとで使います。
https://dl.dropboxusercontent.com/u/36583594/outsource/something.sushijson
中身はこんなの。
showAtLog: {
"message": "hello world!!"
}
->showDialog: {
"message": "自動的にファイルが一個作られます。\n1分もしないうちに消えると思いますが、お楽しみください。 @toru_inoue"
}
->createBuffer: {
"name": "hello_its_new_text"
}
->modifyView: {
"name": "hello_its_new_text",
"add": "はいこんにちわ。\n",
"injects": {
"add": "message"
},
"selectors": [
{
"showAtLog<-message": {}
}
]
}
->wait:{
"ms": 1000
}
->modifyView: {
"name": "hello_its_new_text",
"add": "今実行したファイルで、\n",
"injects": {
"add": "message"
},
"selectors": [
{
"showAtLog<-message": {}
}
]
}
->wait:{
"ms": 1000
}
->modifyView: {
"name": "hello_its_new_text",
"add": "この文章が自動的に書かれています。\n",
"injects": {
"add": "message"
},
"selectors": [
{
"showAtLog<-message": {}
}
]
}
->wait:{
"ms": 1000
}
->modifyView: {
"name": "hello_its_new_text",
"add": "あと3行くらい書いて止まると思います。\n",
"injects": {
"add": "message"
},
"selectors": [
{
"showAtLog<-message": {}
}
]
}
->wait:{
"ms": 1000
}
->modifyView: {
"name": "hello_its_new_text",
"add": "\n",
"injects": {
"add": "message"
},
"selectors": [
{
"showAtLog<-message": {}
}
]
}
->wait:{
"ms": 1000
}
->modifyView: {
"name": "hello_its_new_text",
"add": "こんな感じで書き足すことが出来たり、",
"injects": {
"add": "message"
},
"selectors": [
{
"showAtLog<-message": {}
}
]
}
->wait:{
"ms": 100
}
->modifyView: {
"name": "hello_its_new_text",
"add": "思ったより素早く書いたりできます。",
"injects": {
"add": "message"
},
"selectors": [
{
"showAtLog<-message": {}
}
]
}
->wait:{
"ms": 10
}
->modifyView: {
"name": "hello_its_new_text",
"add": "フフフ、怖いか?\n",
"injects": {
"add": "message"
},
"selectors": [
{
"showAtLog<-message": {}
}
]
}
->wait:{
"ms": 1000
}
->modifyView: {
"name": "hello_its_new_text",
"add": "赤線で囲んだり、\n",
"injects": {
"add": "message"
},
"selectors": [
{
"appendRegion": {
"line": "7",
"message": "",
"name": "hello_its_new_text",
"condition": "keyword"
}
}
]
}
->wait:{
"ms": 1000
}
->modifyView: {
"name": "hello_its_new_text",
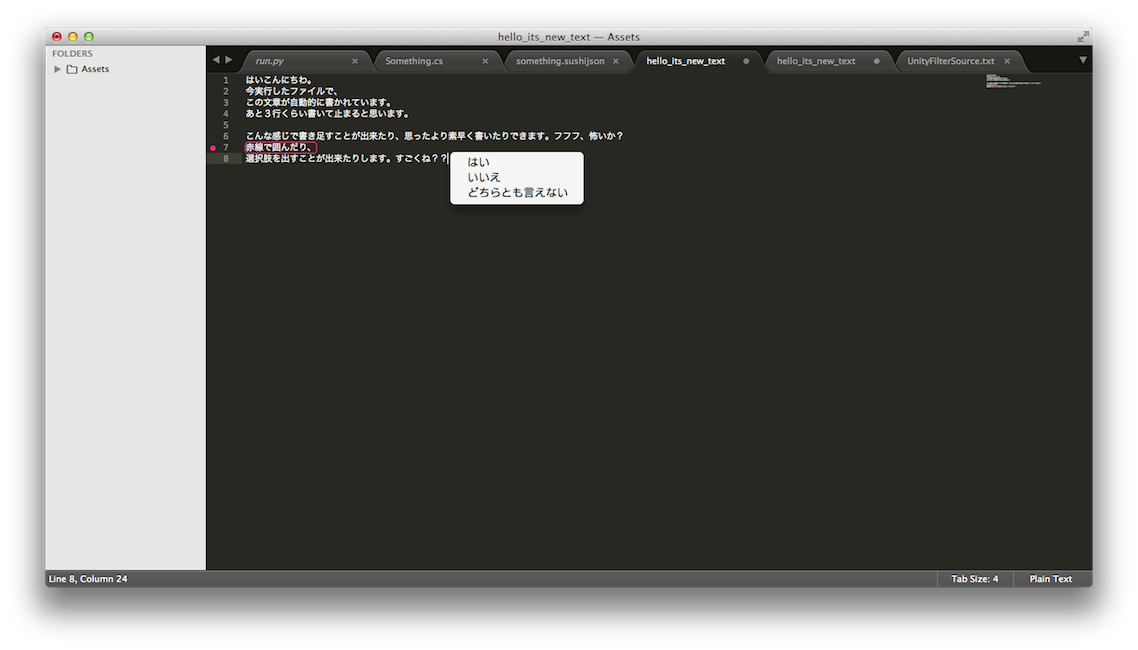
"add": "選択肢を出すことが出来たりします。すごくね??",
"injects": {
"add": "message"
},
"selectors": [
{
"showToolTip": {
"name": "hello_its_new_text",
"onselected": [
{
"はい": [
{
"showDialog": {
"message": "ワーイ!! というかんじのやつです!",
"selectors": [
{
"closeFile": {
"name": "hello_its_new_text"
}
}
]
}
}
]
},
{
"いいえ": [
{
"showDialog": {
"message": "ァ、、ァ、、以上です。",
"selectors": [
{
"closeFile": {
"name": "hello_its_new_text"
}
}
]
}
}
]
},
{
"どちらとも言えない": [
{
"showDialog": {
"message": "そんな曖昧な君が好き。嘘です。以上です。",
"selectors": [
{
"closeFile": {
"name": "hello_its_new_text"
}
}
]
}
}
]
}
],
"oncancelled": []
}
}
]
}
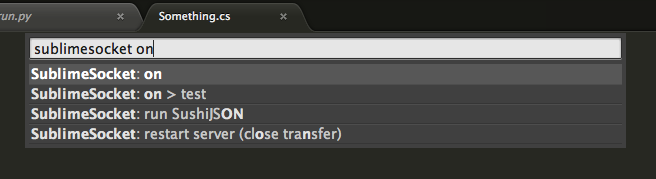
3.Sublime Textを起動してコマンドパレットからsublime socket: run SushiJSON
super + shift + p -> sublime socket: run SushiJSON
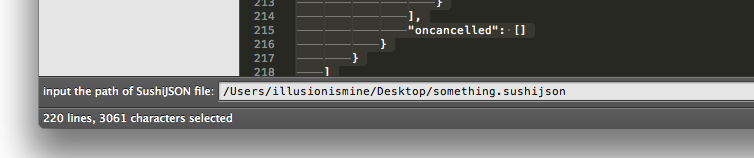
4.下のほうに入力窓が出てくるので、2でDLしたファイルを指定してエンター
こんな感じ。 入力が終わったらエンターを押してください。
すると、
寸劇が始まります。
いかがだったでしょ。
明日はcipherさんです。